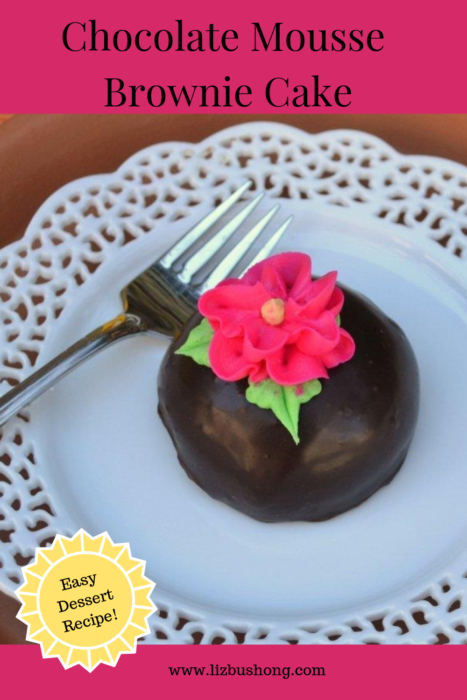

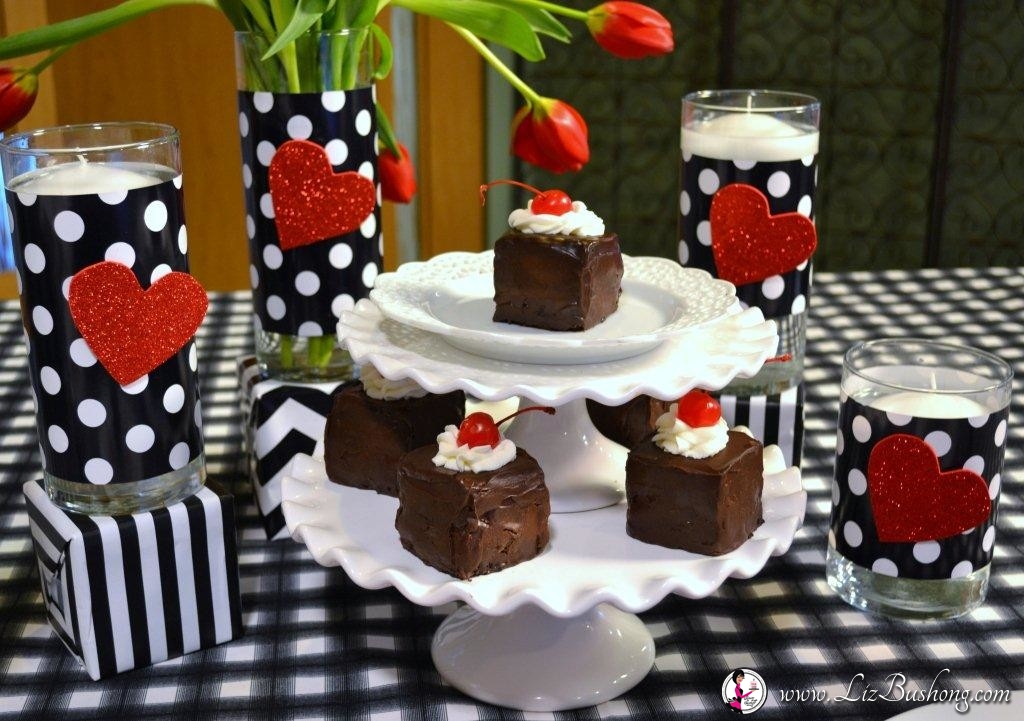
Black Forest Mini Cakes for dessert will satisfy every chocolate lover and then some! In addition, this dessert recipe is very impressive and is made ahead. Triple layers of baked chocolate cake squares are sandwiched together with chocolate whipped cream and cherry jam. A 2 x 2 inch square silicone mold creates the shape of the desserts during brief time in freezer. When cakes are solid, the little cakes, are coated with dark chocolate ganache. Delicious! Right before serving the desserts are garnished with a dollop of whipped cream and long stemmed cherry. Piece of cake Right?
Recipe for Mini Black Forest Cakes Below:
Black Forest Mini Cakes

You will need a square 2″ x 2″ silicone baking mold for this recipe, boxed chocolate cake and instant pudding and pie mix. This makes the cakes very moist and firmer to hold the repeated layers of chocolate whipped cream and weight of ganache. Please allow for freezing time at least 6 -8 hours before coating with ganache.
- Prep Time: 20 minutes+ Freeze time 6-8 hours
- Cook Time: 20- 25 minutes
- Total Time: 45 -60 minutes
- Yield: 16 Mini Cakes 1x
- Category: Dessert
- Method: Baking
- Cuisine: Amercian
Ingredients
1–16.5 ounce package Dark Chocolate Fudge Cake Mix
1–3 ounce package Chocolate Fudge Instant Pudding and Pie Filling
1–1/3 cup water
1/2 cup vegetable oil
3 eggs
1– teaspoon vanilla
1–cup cherry jam-melted
1-recipe dark chocolate ganache
Chocolate Whipped Cream Filling
1– cup whipping cream-chilled
2– tablespoons Hersey’s Special Dark Cocoa
1/3–cup confectioner’s sugar
Garnish
Whipped Cream
12– maraschino cherries with stems-drained
Baking Equipment Needed:
2 x 2 inch Square Silicone Baking Mold*
Chocolate Ganache
2/3–cup heavy whipping cream
1-cup mini or regular chocolate morsels
Ganache recipe covers 5 cakes. Double recipe for remaining cakes.
Instructions
- Preheat oven 350 F. Line a 9 x14 baking sheet with parchment. Spray with cooking spray.
- In large mixing bowl, add mixes and next 4 ingredients. Blend to mix about 30 seconds, beat at medium speed for 2 minutes. Pour batter into baking sheet, smooth top with flat edge spatula to level.
- Bake for 20-25 minutes. Remove from oven and loosen edges of cake from pan, Let cake cool.
- Place cake in freezer to firm. Cut cake into 2 x 2 inch squares using a square cookie cutter or cardboard pattern. You will have 28 squares. Cut each cake square in half horizontally. Place one cake in each mold brush with melted cherry jam. Prepare Chocolate Whipped Cream, then see how to assemble.
- Chocolate Whipped Cream filling; place cocoa and confectioner’s sugar in mixing bowl with whisk attachment. Blend the cocoa and sugar, then add cold whipping cream Beat at high speed until stiff peaks are formed. Place whipped cream in a pastry bag with round wide tip or clipped zip-lock bag. Set aside.
To assemble: Cut each frozen square cake in half horizontally. Place one cake in each mold, brush with melted cherry jam. Pipe chocolate whipped cream thinly on top of cake. Repeat with another cake layer, jam, whipped cream. Layering three times. Place in freezer several hours to set. Remove cakes from mold. Before pouring ganache over cakes.
Chocolate Ganache Instructions: Heat 2/3 cup whipping cream in microwave safe bowl for 50 seconds. Cream will be very warm but not boiling. In a small bowl with morsels, add cream. Stir mixture until smooth and shiny.
Place cakes on wire rack on top of parchment lined baking sheet. Pour melted and smooth ganache over the cakes covering entire surface. Garnish with whipped cream and long stem cherry. Serve immediately or keep refrigerated up to 3 days.
Notes
- If ganache sets up before you can pour over cakes. Gently reheat in microwave at 10 second intervals to remelt. Stir until smooth.
How to Make Cakes: Step 1: Cake & Freeze
Bake your cake as recipe suggests, cut the cake into 28-2″ x 2″ squares using a square biscuit or cookie cutter. Make sure your cutter is the same size as your silicone mold. Freeze these cakes 30 minutes. Slice these cakes in half horizontally using a serrated knife, place one slice in the bottom of the mold sections. NO need to spray mold. You will use three cake sliced per mold for your mini cake. Brush cake slice with melted cherry jam. You will coat one side of each cake with jam.

Step 2: How to make the Chocolate Whipped Cream Filling
There is an easier way to mix the chocolate for the whipped cream. In your mixing bowl, place 1/3 cup confectioners sugar plus 2 tablespoons Hersey’s special dark cocoa, stir this around with whisk, then add the 1 cup chilled heavy whipping cream . Beat on high speed until peaks form. I did it the old fashioned way, folding it in.. but later decided I could mix it faster and better as mentioned.
Step 2: Alternate
If you don’t have a mold you can stack your cakes by hand, after cutting them apart. Just coat each side with jam, then pipe in the filling. Stack three layers of cake together then wrap in plastic wrap and freeze until hard. After they are frozen, go to step 5, covering with ganache. We are getting close to another fun part! Piping the filling in the mold.
Step 3: Pipe the Filling in Mold

After whipping the chocolate whipped cream, fill piping bag fitted with a large open tip #12 for piping on top of bottom cake layer. Add another cake layer, brush with melted cherry jam, pipe chocolate whipped cream and top with third cake layer. Spread jam on the bottom of this last cake slice so it will stick to the whipped cream. The cakes will fill the mold. Do not coat top cake piece with jam. Cover with plastic wrap and freeze to firm.

Step 4: How to make the Ganache Glaze

How to Make the Ganache: Heat 2/3 cup heaving cream in a microwaveable bowl for 50 seconds. Add 1 cup of chocolate morsels, stir to blend. You will think you made a mistake, but keep stirring, it is amazing how the chocolate comes together. The chocolate will be smooth and very shiny. Now you are ready to pour over the cakes. If this ganache gets thick, just reheat in microwave gently until smooth again. The ganache recipe will cover 5 mini cakes, so you will need to double the recipe.
Step 5: Covering the Cakes
Remove mini cakes from the mold. Yeah! This is the another fun part..to see what the cakes look like. Now you are ready to coat the entire cake with chocolate ganache. Place a cooling rack on top of a parchment lined baking sheet, place one cake on the rack and pour the chocolate over the entire cake. Using an off-set spatula smooth top first then the sides. If you missed a part of the cake, just spoon more chocolate over the top of cake and let it slide down the sides of cake. Smooth the cake with your spatula. I use a small spatula and not the large one, it is easier to handle on these small cakes.

If you don’t want to cover the cake with ganache.. you could just pipe dollops of chocolate whipped cream to the top of the cakes and add chocolate shavings or cherry. I used a long stem maraschino cherry.
After cakes are coated. Keep in refrigerator until ready to serve. Before serving, pipe a dollop of whipped cream and add the cherry. Everything is better with a cherry on top!
Enjoy! These look like a lot of work, but once you get started it really isn’t. You will have fun making these. The square baking mold is really a must for perfectly shaped cakes.
Happy Creating! XO
To Make This You’ll Need These Helpful Tools ..just so ya know these are affiliate links where I could possibly earn a small residual from your purchase; as a way to help supplement the cost of creating these great recipes. Instead of having tons of advertising popping up through out this website I have chosen to work through affiliations, which is no cost to you.
My Favorite Tools used in this Recipe:
Square Silicone Mold, You will love the mold, it can be baked in, frozen, dishwasher safe and really amazing to use. Just click on the highlighted links to order.
Piping tip #12, Piping tip helps fill the mold easily without getting the whipped cream on the insides of the mold, You will also need tip # 1M for the swirl whipped cream dollop garnish. These tips will be used repeatedly through out your baking.
Creme Bouquet Professional Strength Flavoring. Creme bouquet makes the best flavoring for whipped cream, frosting, cakes, cupcakes, macrons, and waffles. I use it all the time. It is my secret ingredient. Oops .. no longer a secret. ha ha …All of my favorites!!!
More Creative Ideas You Might Like to Try:
No Bake Mini Cheesecake (requires a round silicone mold). This is an affiliate link. Click on photo for recipe.
Chocolate Cake with Chocolate Buttercream Frosting. It is actually Chocolate Torte Dessert Recipe. I call it Tall, Dark and Handsome Cake! ha ha, Click on photo for recipe.