Easter Bunny Butter Cookies with Royal icing
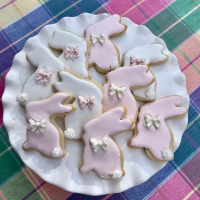
Butter cookies cut into bunny shapes, frosted with white & pink royal icing and candy melt bows.
- Prep Time: 30 minutes
- Cook Time: 8-10 minutes
- Total Time: 60 minutes +decorating time
- Yield: 4 dozen- 2" cookies 1x
- Category: Desserts- Cookies
- Method: Baking
- Cuisine: American
Ingredients
Butter Cookies
- 6 cups all purpose flour
- 3 teaspoons baking powder-tested Rumford
- 1 teaspoon salt
- 2 eggs
- 2 cups butter (4 sticks)-not margarine-tested: Land o Lakes salted
- 2 teaspoons vanilla or creme bouquet flavoring
- 2 cups granulated sugar
Royal Icing with Meringue Powder
1 pound confectioner’s sugar, sifted
5 tablespoons meringue powder
1/2 cup water
1/4 teaspoon clear vanilla or creme bouquet flavoring
soft pink food gel
Decor
1 bag Bright white candy melts
1/2 to 1 cup white non peril sprinkles
bow mold
Instructions
Making the Cookies
- With a stand mixer prepare cookie dough, cream sugar and butter until fluffy, about 5 minutes.
- Add eggs and flavoring.
- Mix dry ingredients in separate bowl and add to butter mixture. Mix well.
- Divide dough in half and place between two sheets of parchment paper to roll into desired thickness, 1/8 to 1/2″. I used 1/4″ thickness for these cookies. Repeat with the rest of the dough.
- Put the rolled dough including the parchment paper on a baking sheet and refrigerate for 10 minutes or longer. Your dough will be chilled and ready to cut and bake with no wait and no added flour! Repeat the process with scraps after cutting cookies.
- Bake at 375 degrees for 8-10 minutes. Let cool on rack. Prepare royal icing the day you want to frost. Otherwise, wrap cookies and freeze up to 30 days until ready to decorate. When ready, remove from freezer to thaw 30 minutes to room temperature before frosting.
Royal Icing Instructions
- Sift confectioners sugar in large mixing bowl fitted with paddle attachment.
- Add remaining ingredients, beat on low speed until smooth and creamy 8 minutes.
- If icing is too thick add more water, a teaspoon at a time. If too thin, beat icing 2-3 minutes longer.
- Color 1 cup icing with desired color. I used soft pink food gel. Gradually add food coloring gel a little at a time for desired color.
How to Flow or Flood Icing for body of cookies
To achieve a thin flowing icing, continue to add water, a teaspoon at a time until icing resembles the consistency of heavy cream. Squeeze bottle work best for decorating the surface or body of the cookie, but you can use a disposable piping bag with small round tip for this kind of icing.
Decorating Cookies
- Outline outside edge of cookie.
- Flood in outlined area by using a disposable piping bag with small round tip- 1/8″ opening or tip # 5 which is closer to 1/4″. Create back and forth brush-like strokes while squeezing out icing. Use tool pic or toothpicks to help spread icing into to corners or edges. Small brush strokes works best. Dip tool end in wet frosting use small stirring motion while keeping the pic in the frosting but not touching the cookie, then move it slowly in the desired location.
- Let cookies dry or set for 30 minutes.
Make the Bows
Melt candy melts in microwave safe bowl, heat at 12 second intervals until melted. Spoon melted candy over mold, use off set spatula to remove excess candy off mold and fill in bow openings. Chill in refrigerator for 5 minutes. Remove from refrigerator and pop out tiny bows. Repeat with remaining melts.
To tint the melts soft pink, when white melts are melted and smooth, add tiny bit of soft pink food gel and stir to blend.
After cookies set, pipe small round dot of icing for bunny tail, sprinkle immediately with white non peril sprinkles. To attach bow, pipe small dot of icing to back of bow and attach to the neck of the bunny cookie.
Notes
If you don’t want to use meringue powder see this recipe.
Cookies can be baked ahead and frozen up to 30 days.
Tip: The thicker the rolled dough the more time needed to bake. I used 1/4″ thickness and 2″ bunny shaped cookie cutter. The size of the cookie cutter will determine the yield amount.
Recipe adapted from Karen’s Cookies