
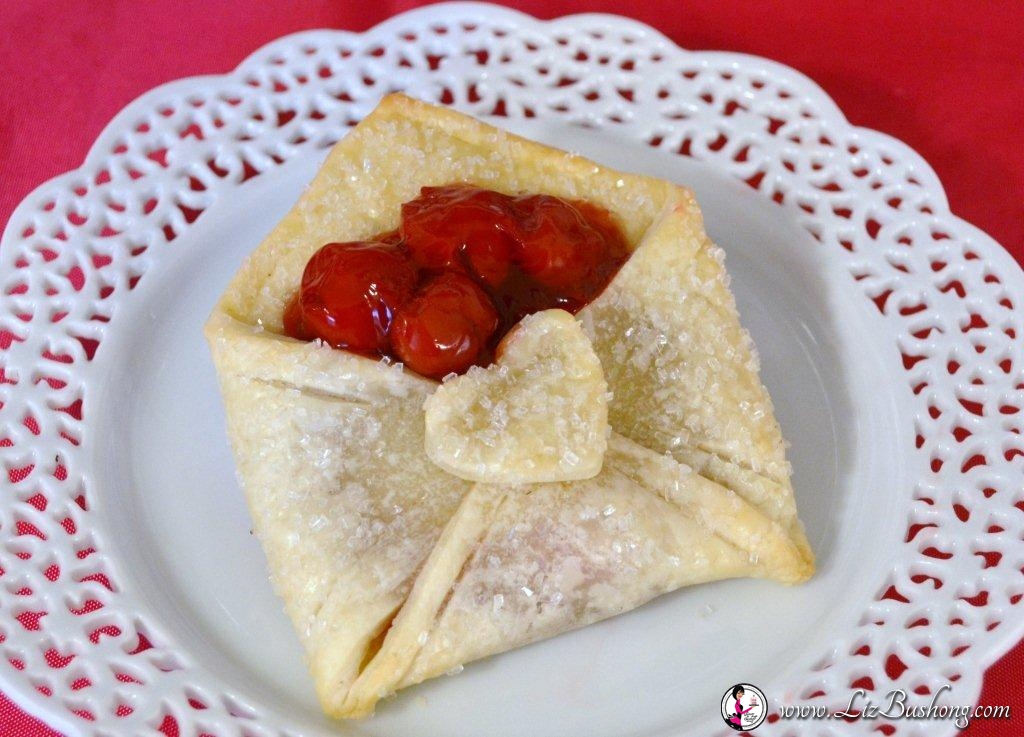
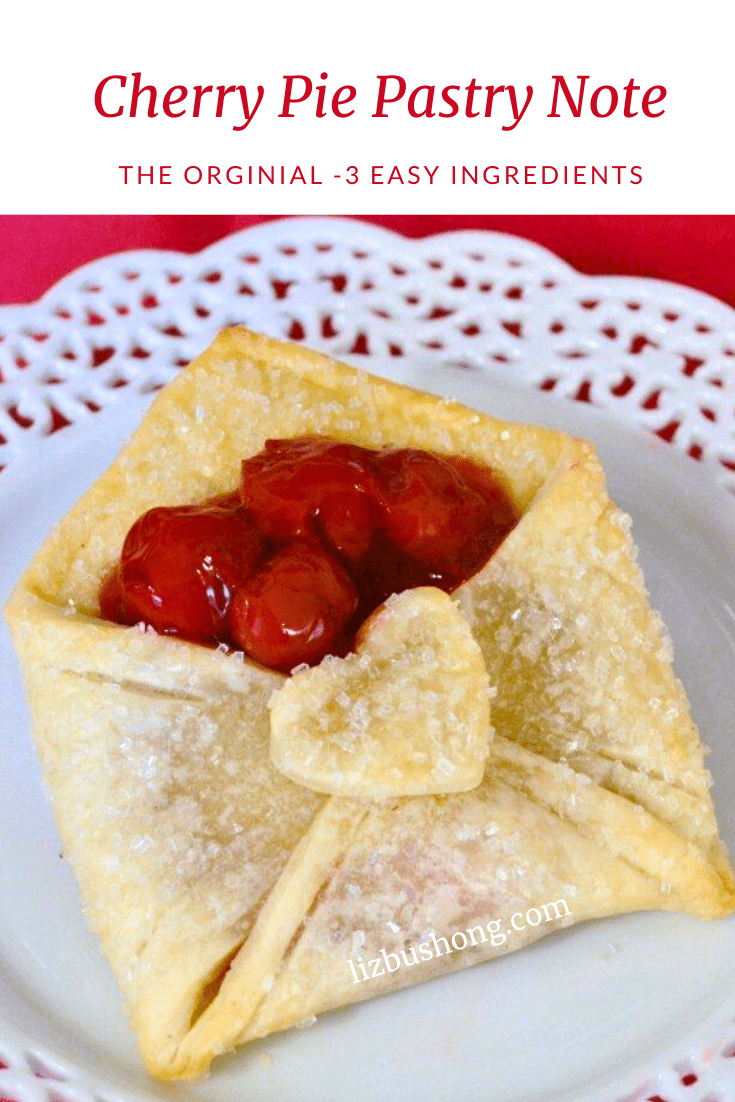
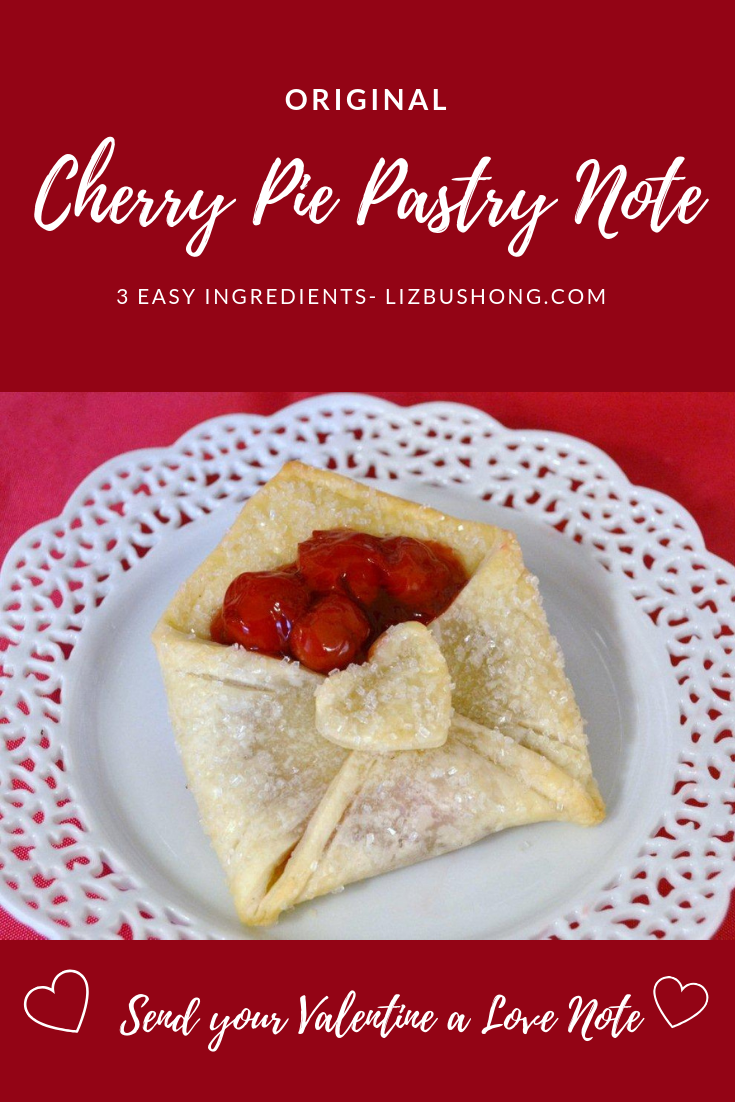
Make this Cherry Pie Pastry for your next Valentine’s Day Tea or Party. The pastry crust is folded like a small envelope then filled with a sweet cherry filling, sprinkled with sparkling sugar and baked until golden brown. The sparkling sugar gives the pastry a glistening look and another layer of sweet. So fun, so easy and so cute. Read more for instructions on how to make this little sweet envelope of goodness.
This recipe and photo for the Cherry Pie pastry envelope is for your personal enjoyment and not for profit as in selling in bakeries, restaurants, deli’s, on line shopping -shipping. If you would like to post the recipe and photo on your website – magazine please contact info@lizbushong.com. Thank you so much.
Helpful tip: Select canned pie filling with a lot of fruit. Drain the fruit from the filling and pat dry with paper towel the individual cherries.(when baking the cherries will create it’s own juice). Jams/marmalades will not work.. too runny after baking. 🙂
This recipe and photo for the Cherry Pie pastry envelope is for your personal enjoyment and not for profit as in selling in bakeries, restaurants, deli’s, on line shopping -shipping. If you would like to post the recipe and photo on your website – magazine please contact info@lizbushong.com. Thank you so much.
PrintCherry Pie Pastry Envelope
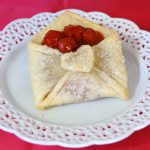
Easy cute pastry note, refrigerated pie crust folded like an note card envelope, filled with canned cherry pie filling, sprinkled with sparkling sugar and baked to perfection. This is my original recipe.
This recipe and photo for the Cherry Pie pastry envelope is for your personal enjoyment and not for profit as in selling in bakeries, restaurants, deli’s, on line shopping -shipping. If you would like to post the recipe and photo on your website – magazine please contact info@lizbushong.com. Thank you so much.
- Prep Time: 15 minutes
- Cook Time: 12-15 minutes
- Total Time: 30 minutes
- Yield: 4 Pastries 1x
- Category: Dessert
- Method: Baking
- Cuisine: American
Ingredients
1 package refrigerated piecrust
1 can cherry pie filling
1/2 cup sparkling sugar
1/4 cup whipping cream
One 4 x 5 inch paper envelope
One small heart shaped cookie cutterInstructions
- Unroll pastry on floured surface.
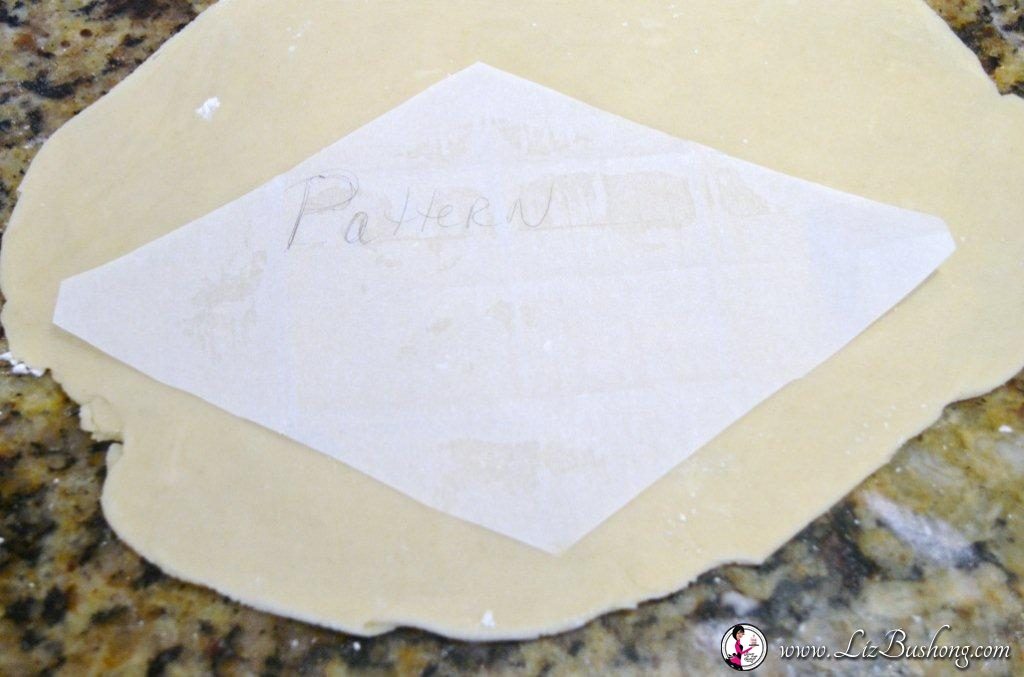
- Open a 4 x 5 ½ inch paper envelope and use as a pattern.
- Reduce the pattern to make a smaller envelope if desired. Trace pattern onto parchment paper. This is your pattern. Cut pastry into 4 envelopes and 4 small heart shaped cut outs.
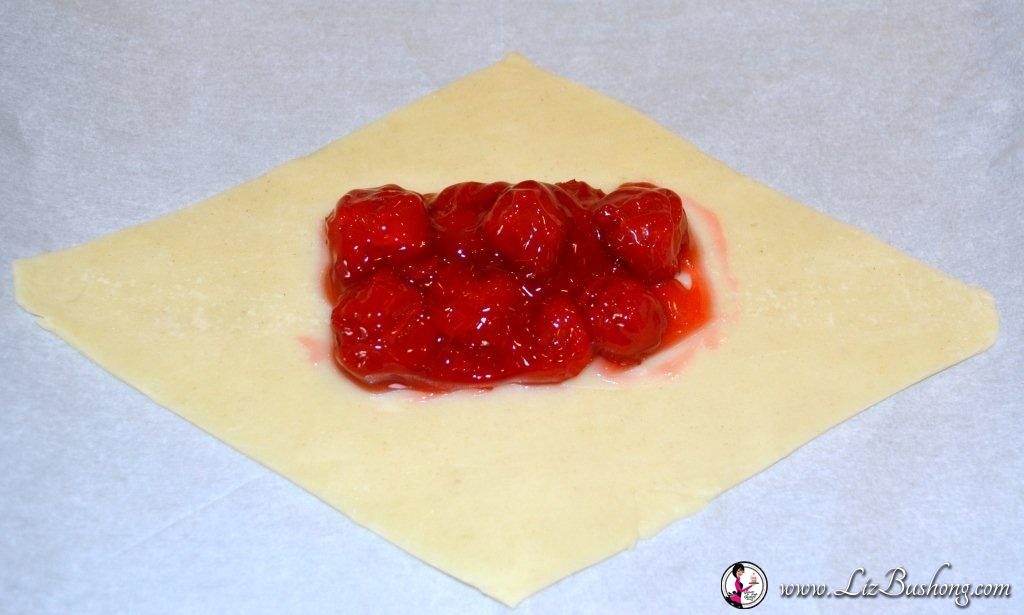
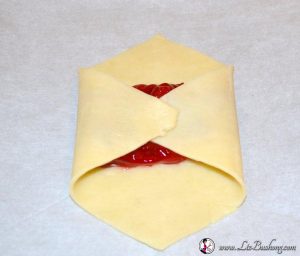
- Fill pastry with cherry pie filling, but not on the back flap. Following the folds of the paper envelop, fold the cutout pastry, leaving the upper flap open.
- Place heart cut-out on folded edges of pastry envelope. Place pastry on parchment lined baking sheet. Brush with whipping cream then sprinkle with sparkling sugar.
- Bake pastry at 375 degrees for 15-20 minutes or until lightly browned. Do not remove from baking sheet until completely cool.
Notes
- Before baking cover the envelope flap and bottom corners of pastry with pieces of foil so it will not burn.
- Bake two at a time on your baking sheet .
- Create Strawberry Filled notes using canned strawberry filling.
- Best results. drain the fruit from the filling and pat dry before placing on pastry. This will keep your tart from being too runny.
- Be careful not to add too much cherry thickened filling to the pastry, it will run out during baking and not be as pretty as you would like. There is juice in the cherries so the less thickened filling you use the better.
How to make this Cherry Pie Pastry Envelope
The pastry is refrigerated pie crust that you find at your local grocery store. The filling is canned cherry pie filling, be sure to watch for cherry pits in the filling. You don’t need much filling for each pastry. If you overfill it, the filling will spill over the pastry and the presentation will not be pretty. I also used a sharp knife to score around the edges of the crust for added decoration. You can make this small pastry with any pie filling. This cute little pastry was inspired by A Little loveliness blog , with Melissa Lester.
Step by Step Pastry Envelope Folding
Make a pattern from the size of envelop you want to copy. Place the pattern on the rolled pie pastry, I used Pillsbury Pie Crust®. Using a sharp knife cut around pattern. Place this pattern on a parchment lined baking sheet. I also tested Gluten free pie crust it is was not successful.
Add 1 large tablespoon of filling to upper third of pastry. Allow about 1/2 inch space all around the filling. You can pick up the edges of the pastry to see if the pastry will fold easily and not have the filling ooze out from the sides. Fold over the right pastry flap or extension over the center of the filling. Then repeat with other side. Tip: Make sure you purchase canned cherry pie filling with extra cherries. Drain off thickened sauce from cherries before putting on dough. When it bakes you will have less spillage. You want more cherries than sauce.

Fold over opposite corner as seen in photo.
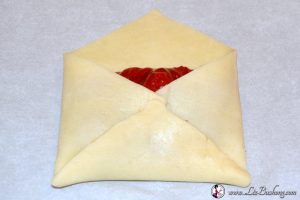
For last fold, turn up pastry point facing you to from the opened envelope. To help with the presentation and to keep all the envelope points joined , add a heart pastry cut out from the pie crust scrapes. Using a small amount of water on your fingertip as “glue” to hold the heart shape in place.
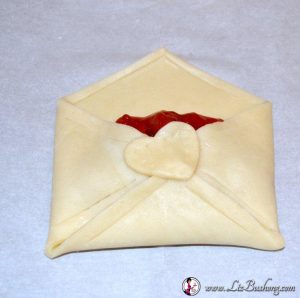
Take a sharp knife and score around each flap and edges of envelope. You don’t have to do this, but it gives the pastry more definition after baking.
Cherry Pie Pastry Envelope to Ready to Bake
Brush an egg wash, water or cream over the finished pastry then sprinkle with sparkling sugar. Now it is ready to bake. Bake at 375 for 15-20 minutes. Watch carefully so it doesn’t burn. Lightly cover with foil it the edges get brown before the center bakes. Remove from oven and allow to cool, before removing from baking sheet.
Thank you to the following bloggers/magazines and foodies who have shared this little note of cuteness with their audiences. Thank you for sharing my link with your posts. Very much appreciated!
Town & Country Magazine 27 Best Valentine’s Day Breakfast Recipes to Treat Your Sweetie
Women’s Day –Pie Envelopes Are Better Than A Valentine’s Day Card
Delish.com –Pie Envelopes Are Better Than A Valentine’s Day Card
Detik Food.com– Indonesia- Special for Valentine-This Envelope Pie Can Be a Cute Valentine Gift!
Simple Most.com These Cherry Pie ‘Envelopes’ Are Like Edible Love Letters For Valentine’s Day
CNN Indonesia Sweet Love Letters’ Love Lover on Valentines Day
Country Living Magazine- Pie Envelopes Are Better Than A Valentine’s Day Card
Aileen Luib- The Baller on a Budget blog-16 VALENTINE’S DAY DESSERT RECIPES THAT WILL MAKE YOU LOOK LIKE A PRO PASTRY CHEF
15 Deliciously Decadent Valentines Day Desserts
Agrandlife.net/valentines day breakfast
This recipe and photo for the Cherry Pie pastry envelope is for your personal enjoyment and not for profit as in selling in bakeries, restaurants, deli’s, on line shopping -shipping. If you would like to post the recipe and photo on your website – magazine please contact info@lizbushong.com. Thank you so much.
Other Ideas You Might Like to Try:

This cherry pie pastry recipe will surely satisfy your cravings.
I love this idea for valentine’s day or anniversary
This is just darling.
Thank you so much! They are fun to make.
Has anyone tried these with filo dough? Yum.
Great question! I don’t know but my guess is filo dough would be difficult to work with, being so flaky, it may not hold it’s shape or design? Could be fun to try though. xo
Has anyone tried puff pastry?
Yes, it is too puffy and causes the shape to be lost. Check out my new cherry & berry envelope cookies made with sugar cookie recipe. They are so cute and taste great. https://lizbushong.com/mini-cherry-berry-envelope-cookies/.
Happy Baking